


FAQ ROTARY ACTUATORS
Below we have answered frequently asked questions from our customers. If you do not find your answers here please contact your closest wholesaler or ESBE Sales company in your country.
What type of actuator/controller fits to my ESBE valve?
Please use the
I've got VRG13x valve and I need an actuator for it. What would you recommend?
For VRG valves we recommend to use actuators ARA600 series. However, besides valve type it is very important to know the correct control signal. Actuators can be driven by 2-point, 3-point or proportional signal and have a power supply of 24V or 230V. Most boiler controllers are using 3-point control signal with 230V power supply, but we highly recommend checking proper actuator parameters in boiler or controller manual.
!Disclaimer: 15sec actuator is not applicable on DN40/50
How shall the actuator be assembled on the valve ?
- Set the valve in midposition. Examples are in the valve user instruction
- Assembly the actuator on the valve according to actuator user instruction
- Power up the actuator first after you are sure about correct assembling
The actuators and valves are always delivered in midposition from ESBE.
If the actuator is not in midposition
- Set the actuator in manual mode and set in midposition
- Assembly the actuator on the valve
- Change the actuator back to originale position and set in automatic mode
How can I mount a used ARA6xx actuator in a correct way on a Mixing valve?
Follow these steps:
- Actuator: Activate manual operation mode and turn the knob (= the gear box) to the mid-position.
- Actuator: Remove the knob by pulling it out from the controller. Make sure to not rotate the position set in point 1 during removal.
- Valve: Turn the mixing valve to mid-position (desired) and assemble the adaptor kit.
- Actuator: Assemble the actuator to the valve and fix it with the M5 bolt.
- Actuator: Re-place the knob on the actuator and gently push it down as you rotate the knob to find its correct position.
Is it possible to mount an M60 actuator on a VRG valve?
No, this is not possible. We recommend replacing the actuator together with the valve to secure an optimal operation. Suitable actuator is found in our replacement guide that is available in the “Support” section.
The valve and actuator is not working properly, what is wrong?
Check that the valve and actuator are correct assembled together, more information regarding different applications and how to assembly can be found in the User instruction or on this web site.
Actuator is oscilatting back and forth.
There could be several reasons why the actuator is going back and forth:
- Check that the signal to the actuator is correct and without any disturbance
- Check if the valve is oversized by calculating the needed KVs value in your system. Calculation can be made in ESBE Hydronic Selection software that is available on this web site.
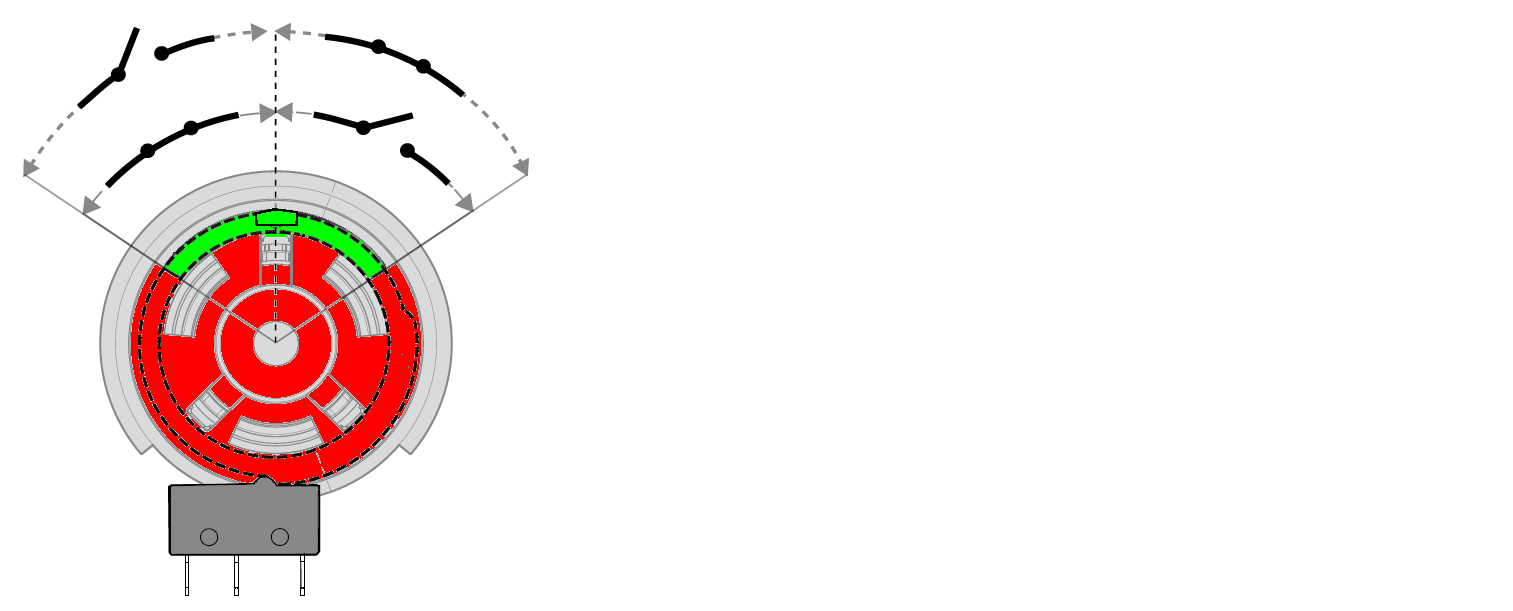
For what can the Auxiliary switch on the actuator be used?
The microswitch can be used to connect external equipment that you would like to start/stop by the valve position. Example could be circulation pump that you would like to turn of if the valve is closed. Another example can be auxiliary heat that you would like to turn on when the valve reach a specific valve postion.
ARA600 is working but the valve and the white linkage kit is not moving, what is wrong?
- Check that the valve and actuator are correct assembled together, more information regarding different applications and how to assembly can be found in the User instruction. The User instruction is available on the Product page and the folder "Download Area"
-Check that the knob of the ARA is not in manual position. See pictures below.

What is adjusted with the green ring on the ARA600?
With the green adjusting cam you are changing when the auxiliary switch will be activated/deactivated.
How do I change the working direction of my actuator, ARA600 3-point (ARA6X1; ARA6X2; ARA6X3; ARA6X4)?
By swapping the black and brown cable during installation you can change the working direction.
How do I change the working direction of my actuator, ARA600 2-point (ARA6X5; ARA6X6; ARA6X7; ARA6X8) changed?
By shifting the jumpers/brackets on the circuit board, e.g. from horizontal to vertical.
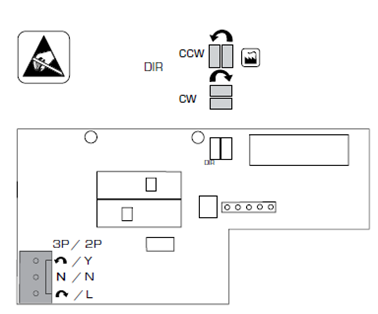
See the instructions manual in the packaging, or on our website for more information.
How do I change the working direction of my proportional ARA600 actuator?
On/off on dip switch 6 - ARA639
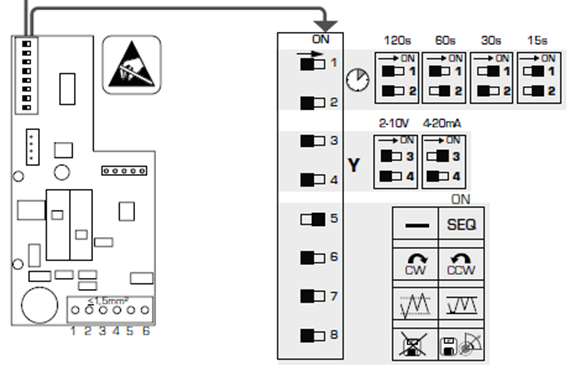
On/off on dip switch 2 – ARA659
Please see User instruction for more detailed information
Is it possible to adjust operating range on actuator series 90?
Yes, it is possible. Series 90 actuators with 3-point and 2-point control signal has a settable operating range between 30 up to 180°, the type 95-270M up to 270°.
For the proportional versions the settable operating range is:
- between 30-90º for version 92P
- between 30-180º for version 92P2
- between 180-355º for version 92P4
Please note, this feature is not made for adjusting the actuator to a wrongly adjusted valve. All ESBE actuators and controllers (not the 92P4) are delivered in the mid position. Before the actuator is mounted, please set also the valve in mid position.
Can the actuator Series 90 be mounted on valves in Series VRG/VRB and VRH?
Yes, it is possible. Please use Adaptor kit VRG801 with article number 16053300.
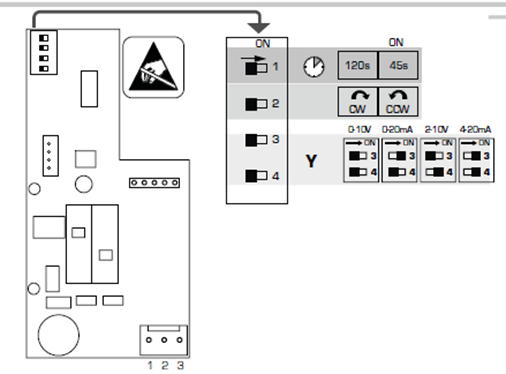
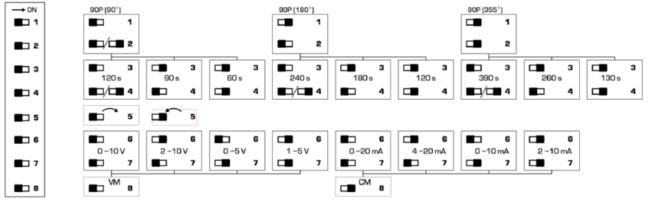
What kind of working angle and running time can be chosen?
The 90P comes with predefined running times for different working angles:
• 90° working angle
120s / 90s / 60s
• 180° working angle
240s / 180s / 120s
• 355° working angle
390s / 260s / 130s
Which control signals can be set on the 90P?
For all running times and working angles following control signals can be set: 0-10V / 2-10V / 0-5V / 0-20mA / 4-20mA / 0-10mA / 2-10mA
How can I set the working direction?
Working direction can be set on the DIP switch no. 5. For clockwise direction of movement, switch should be set to the left. For counterclockwise direction of movement, switch should be set to the right.
![]()
How do I do the setting of the actuator?
To set the actuator operating angle, direction and running time, as well as control signal, please follow the instruction manual where all DIP switches and its position are explained. DIP 1 and 2 – setting of the working angle. DIP 3 and 4 – setting of the running time. DIP 5 – setting of working direction. DIP 6 and 7 – setting of the control signal DIP 8 – setting of the control signal (voltage or current).
By changing the operating angle on the DIP switch, an additional adjustment on the rotating disk is needed – this allows the actuator to move according to the DIP switch settings and end switches will stop the valve in the right position. (follow the instruction manual).
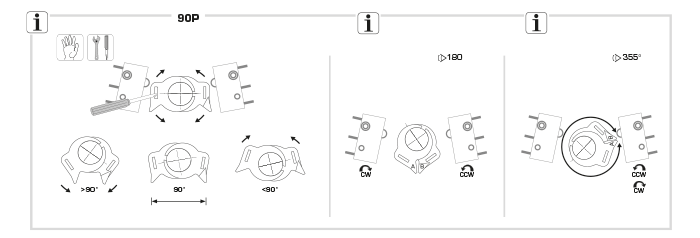
Can I use the handle in any case and any operating angel?
No, the handle should be removed when angel is set or above 180°.