


CRA
Below we have answered frequently asked questions from our customers specific for the controller CRAxxx. If you do not find your answers here please contact your closest wholesaler or ESBE Sales company in your country.
How is the opening direction changed on the CRA110 and CRB100?
The rotating direction is changed in the following order:
- Remove the power
- Push and hold the joystick to the same directions as the valve will go from closed to open
- Connect the power again and keep to hold the joystick a couple of seconds
- The working direction is now changed
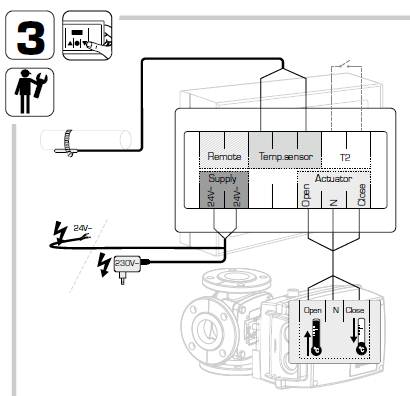
How is the rotating direction on serie CRA120 changed?
The rotating direction is changed in the following order:
- Remove the power
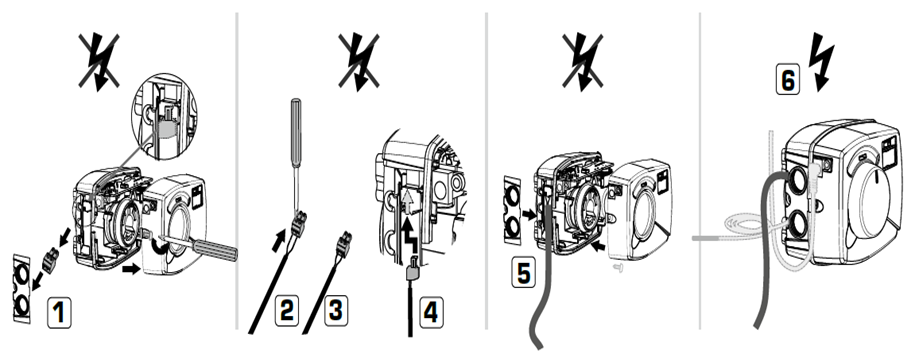
- Unscrew the cover of the controller box
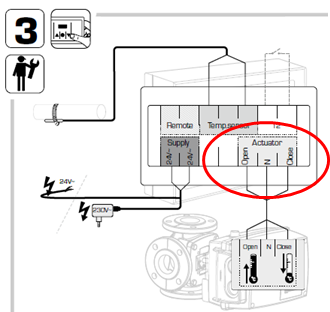
- Change the position of the cables connected to the actuator, please see attached picture
- Reassembly the controller box
- The working direction is now changed
How can I set a temperature above 50°C?
Changing the min. and max. flow temperature is done in the advanced settings menu. The temperature can be set from +5°C to +95°C. See the instructions manual on how to access the advanced settings and change the min and max flow temperature values.
How is the set supply temperature in serie CRA110 changed?
The set supply temperature is changed in the following order:
- Press the joystick shortly
- Increase or decreas the tenperature by moving the joystick to the right or left
- Confirm by pressing the joystick shortly
How is the maximum supply temperature changed on serie CRA110?
The settings are changed in the following order:
- Press down the joystick for 4 seconds
- The wrench and the dot and arrow up will be shown
- Press the joystick shortly and the numbers will be flashing
- Change the temperature by moving the joystick to the right to increase the temperature and to left to decrease the temperature
- Confirm by pressing shortly on the joystick
- Press down the joystick for 4 seconds or wait 20 seconds to return to main menu
How is the minimum supply temperature on serie CRA110 changed?
The settings are changed in the following order:
- Press down the joystick for 4 seconds
- The wrench and the dot and arrow up will be shown
- Press the joystick shortly to the right
- The wrench and the dot and the arrow down will be shown
- Press the joystick shortly and the numbers will be flashing
- Change the temperature by moving the joystick to the right to increase the temperature and to left to decrease the temperature
- Confirm by pressing shortly on the joystick
- Press down the joystick for 4 seconds or wait 20 seconds to return to main menu
How is the set supply temperature in the serie CRA120 changed?
The set supply temperature is changed in the following order:
- Press the middle button shortly
- Increase or decreas the tenperature by pressing the right button (increase) or left button (decrease)
- Confirm by pressing the middle button shortly
How is the maximum supply temperature changed on serie CRA120?
The settings are changed in the following order:
- Press down the middle button for 4 seconds
- The wrench and the dot and arrow up will be shown
- Press the middle button shortly and the numbers will be flashing
- Change the temperature by pressing the right button to increase the temperature and the left button to decrease the temperature
- Confirm by pressing shortly on the middle button
- Press down the middle button forr 4 seconds or wait 20 seconds to return to main menu
How is the minimum supply temperature on serie CRA120 changed?
The settings are changed in the following order:
- Press down the middle button for 4 seconds
- The wrench and the dot and arrow up will be shown
- Press on the right button
- The wrench and the dot and arrow down will be shown
- Press the middle button shortly and the numbers will be flashing
- Change the temperature by pressing the right button to increase the temperature and the left button to decrease the temperature
- Confirm by pressing shortly on the middle button
- Press down the middle button forr 4 seconds or wait 20 seconds to return to main menu
How can T2 be activated by external equipment to the controller series CRA100 or CRB100?
Under the cover of the controller unit is a green connector. On this connector you connect two wires and when the two wires are connected together the T2 temperature is activated. Example of external equipment is the ESBE GSM-module CRB915 (art nr 1705 59 00) where you can swift between the two preset temperature by your cellphone.
NOTE: The signal from the external eqipment must be without any voltage or resistance.
How can T2 be activated by external equipment on series CRA120 and CUA110?
Under the cover of the controller box where is possibilities to connect two wires. When the two wires are connected together the T2 temperature is activated.
Can the controller Series CRA120 be mounted on valves in Series VRG/VRB and VRH?
Yes, it is possible. Please use Adaptor kit VRG801 with article number 16053300.